Gadgets
Besides turning the train on and off, what are you going to do with your train? Just watch it go around? After any length of time spent watching your trains run around, you want to do more, like put trains together and take them apart without touching them, or load and unload freight from them. This is where the gadgets come in.
Gadgets are things that let you do more than just run the trains around and around. They include Switches for sending trains from one track to another, Yards with Uncoupling Tracks for parking cars and building up trains from individual cars, Cranes for lifting and placing cargo, Smoke Stacks for making your Steam Engines produce gorgeous smoke effects, Interior Lighting to make your Passenger Trains look kewl with the lights off, and sweeping Bridges that get your Trains rising up and over each other.
[A Note About The Photography On This Page: Many of the shots and movies on this page were made with cheap digital cameras. Please forgive the lack of quality, I did my best.]
Train Lighting
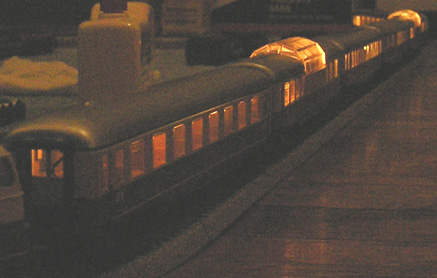 6 Fully Lit TEE Cars
I've always tried to light my Passenger Cars, including "do it yourself" lighting using the wrong kits, because the right ones were hard to get or just too expensive when I was younger.
The Trans Europe Express
One benefit of having worked and lived a bit in The Netherlands however is being able to finally get the right lights for my cars. I finally got all the cars on my TEE Express (The Raffi Train) lit correctly, and its very beautiful.
The shot on the right was made with an Olympus Digital Camera in Macro mode, mounted on a tripod. Despite several attempts, its still not right, but I think you can get the idea of what a lit passenger train in a dark room looks like.
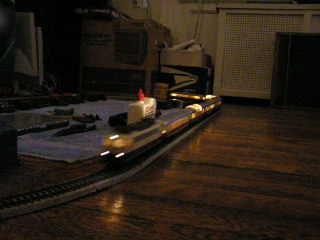 Movie -- Raffi Train Moving
On the left is a very badly made movie of the TEE Express running in the dark. I'm putting this up for Harold Van Aalderen, who helped me get the lighting for these cars. I apologize for the small size and TV audio in the background, but it was originally just a test movie. I had to give back the Olympus before I could make the finished movie. Still, it highlights the effect, note the glare of the train reflecting off my hardwood floor.
My First Passenger Train
I destroyed the first 2 passenger cars I ever had. But then I worked and saved and bought 2 more passenger cars, and I have those until this day. Because Mom was pretty upset that I had destroyed the first 2 passenger cars, I went out of my way to light and enhance the new ones, and to make it a passenger train for the christmas tree.
 Tin Plate Starbursts
I had learned some things about electricity, and I had read up in the catalog about lighting the better passenger cars, and how they had interior details with seats and tables. Even though we couldn't afford a fancy train like that I was determined to light my passenger cars, and to provide real interiors. So, I saved some more, and I bought some lights, and I made an interior for each car with seats and carpets, and I lit the cheapest set of passenger cars that Märklin made back in the early 1970's.
And Mom bought a lighted baggage car, and we had created our own piece of model railroad beauty. Which the Cat promptly pounced upon again and again...
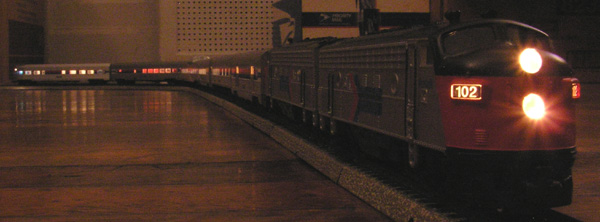 AMTRAK EMD F7 #102
The AMTRACK F7 Streamliner
The best train I have is the AMTRAK model that Märklin made back in the late 1990s. It rides well, looks great, and has some incredible lighting.
I used the Digital Camera to capture some shots with the lights on, even though Frank had already documented it back in 1999 with the lights off. First, notice the road number plates in this long shot, and the starbursts off the headlights.
More importantly, notice the color of the lights in cars -- some are a warmer yellow to simulate incandescent lighting, and some are a brighter bluer white to simulate fluorescent lighting. Märklin not only detailed the car bodies, the engine and the paint scheme, they detailed the lighting.
Here is a shot of the back of the train in a curve that highlights the difference. Note that the last car is blueish-white, the next car is yellowish, and the observation car after it is blueish-white again.
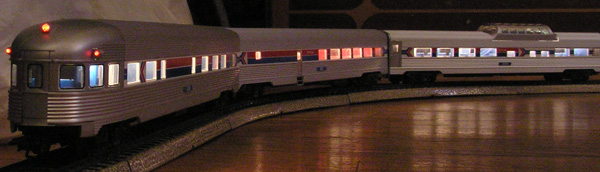 AMTRAK Taillights
Lighted passenger trains are very beautiful, and guaranteed to impress anyone who watches them, particularly if you can turn off the lights in the room.
By the way, at the time of this writing (2006) I estimate the AMTRAK Train is worth $1000 on eBay in fair trading, based upon recent auctions for the same parts in equal or worse shape. But I'm not selling. :)
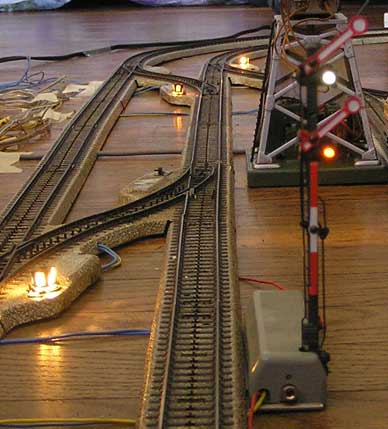
Track Gadgets
When you add electric switches and signals to a layout, it also adds a dimension to your trains. Each switch has a small light showing its current setting, which rotates when you change the switch. The signals also have lights, changing from red to green when they are chaged as well. These things make a satisfying "zzznnng-click" sound when you set them. They have electromagnets (solenoids) inside them, and by pressing and holding a button for a second, a magnet turns on and pulls a metal bar to one side or the other.
 Signal & Switch Lighting
This signal is a Semiphore, which means in addition to lights it also has arms which raise for Green ("open" or "go") and lower for Red ("closed" or "stop"). This one is double-armed, the lower arm is up for "Proceed normally" (i.e. go fast!) or down for "Proceed with caution" (i.e. go slow, the Cat may be ahead on the track!).
The switch lights are kind of interesting. They are small square boxes that are meant to be viewed from either the front or the back (where the Engineer driving the train would see them), and indicate the setting of the switch. From the front, they show a straight line for straight, and an arrow pointing in the direction of the curve for curved. From the back they show a thicker straight line for straight, and a circle for curved.
You use a Control Panel to change all this stuff. Each pair of Red/Green buttons controls one signal or one switch. When you press a button, you have to hold it down to make the the connection, but when you release it, it still stays low on the panel. If you wire it right, you can glance at the panel and see how everything is set. For example, the first pair is Green Down, so its open, the switch is set straight or the signal was set green/go. The remaining pairs are Green Up, so they are all set to curved or red/stopped.
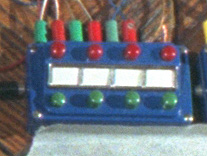 Control Panel
Playing with this stuff with two or more running trains is very kewl, you have to pay serious attention as you move the trains from one track to another, and try to prevent them colliding with each other. Did you remember to set the inner oval switch back to straight before you release the train waiting on the outer oval? If not, maybe it runs inside and right back outside and then rams the other train on the outer oval from behind? And if you did, and the train is now safely running around the inner oval, you have to remember to reset the switch on the outside to straight as well, otherwise the other train heads into the inner oval and maybe rams the one you are trying to save from behind! Does the other train enter the switch just as you reach for the button?
If you're doing this and you are not having fun, sell the trains and take up Crochet or Hang Gliding or something.
Pick Her Up and Set Her Down
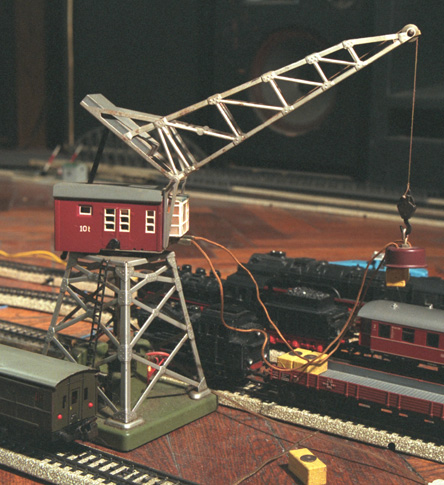 The 7051 Working Crane
Oh, the Crane pictured throughout this web works, Märklin has made this model for many years. It swings back and forth, and the line raises and lowers. There's a working electromagnet that can be turned on and off, and you can see it has hauled up a bale of hay that has a thumbtack pushed into it so it can be picked up.
This version is from about 1975. I've cleaned the base and kept the motors working, but I'm not sure what to do about the rust.
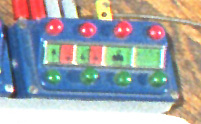 Crane Control Panel
Its operation is deceptively simple and highly addicting. The control panel (shown on right) contains pairs of buttons, The first pair raises and lowers the magnet. The second pair turns (or "slews") the crane left and right. And the third pair turns the magnet and cabinet light on and off. The last pair is unused, but is designed to be used with the Uncoupling track.
Unfortunately, this version cannot raise and lower the boom to bring the magnet closer and farther from the crane body. The black metal rod running from the bottom of the boom through the control cab is a simple saw-tooth device, so you have to set the angle of the boom by hand.
Hours of time can easily be lost removing and placing "cargo" on the cars. Even more time can be lost trying to "flip" one of those yellow bales of hay that has rolled so the thumbtack is no longer on top. You simply knock into it again and again with the edge of the magnet, trying to catch the upper edge while cursing under your breath. No hands, remember?
Even though the Crane doesn't move around on the floor, the Cat still doesn't trust it, because it makes the same noise as the Engines, and therefore must be just as evil. For anyone who's played Half-Life 2, this crane is the same kind they use to move the Dune Buggy in the Ant Lion sequences in the game, and that you get to control when you have to pick your Buggy up and put it on the wharfs above the sand.
Crossing Guards
First, a note about real Crossing Guards:
A Train Hits Something Every 90 Minutes In The US
Crossing Guards are an important piece of equipment for Real Railroads, and the people who drive over their tracks.
Too many drivers are tempted to try and run the crossing when they hear the warning bells and see the gates lowering. Please
don't try to do this, if you get stuck and hit,
you lose. The train coming down that track weighs at least several tons, and possibly over 100 tons or more if it has any cars attached.
It will crumple your car and you like a piece of paper. You lose, period. Stuck on the tracks with a train approaching is certain death. If you are in your car, and it is stuck, just get out and get the hell away. Then immediately contact 911.
From the New York State Govenor's Traffic Safety Committee website (2006):
Question: How often do a vehicle and train collide in the U.S.?
Answer: About every 90 minutes a vehicle and train collide in the U.S.
I cannot stress this enough.
Having said that, a Crossing Guard is one of the first things you might get to spice up your layout. They make noise and look good as the train passes over them, and give your friends and viewers something to watch.
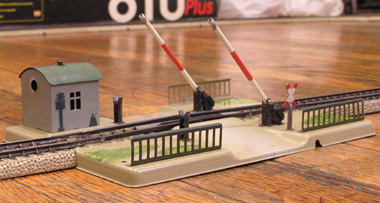 7390 Mechanical Crossing Guard
Its popular because its purely Mechanical, and dosen't need any complicated wiring. You can hook one up on the Christmas Tree layout and you've added instant Gadget Value to the layout. And because its metal, it can take whatever the Cat decides to throw at it. You can also put a light in the little house, see the hole in the side of the base for the wires? Lionel has a famous electric version where a man pops out of the house when the train crosses over and I'm afraid to say that's always beat the Märklin version out on sheer electro-mechanical coolness.
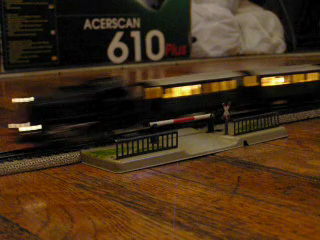 Movie -- Tinplate Hitting The Crossing Guard
Notice how the rails are angled up in the middle of the grade. They are resting on springs, and as the train runs over them, the weight of the engine and cars pushes down the rails, which pull down the gates by a linkage under the baseplate. There's a bit of jiggling as the wheels pass over, since the rails go up and down under the passing cars. And it makes some nice clunking noises too, so all in all it had good entertainment value and is a cheap way to add something to look at to your layout.
Here's a short movie of my Tin Plate train running over the 7390. Everyone one who's been at my house for Christmas knows this experience. Oh, and note the Fat Blue Spark I'm getting off the baggage car's pickup shoe as it rides over the Guard...
Smoking Engines
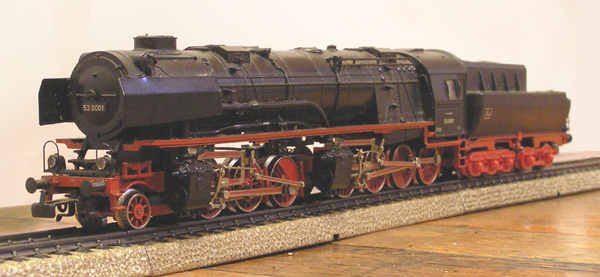 My Borsig BR 53 -- A bit banged up, but a real Smoker
Steam engines look better if they are making Steam. The original toy engines actually did work on Steam, as there was no electricity. Getting a Steam engine that smokes is a really kewl kind of gadget, kind of rare and esoteric. I have a Steam engine that makes smoke...
The Borsig was perhaps one the biggest German Steam locomotives that was never built. The original designs were finished in 1943, but due to the pressure of heavy Allied Bombing, it was never built. After WWII, steam declined rapidly and so the Borsig was forgotten, until Märklin decided to build one anyway, in HO scale, from the original plans.
The body of this model is made of metal. Those driving rods really work. The design is articulated, meaning that the first and second large wheel groups can turn independantly of each other so it can run on tight curves. And this model can make smoke from not 1 but 2 smoke stacks, that is actually 2 separate pipes in one housing at the front.
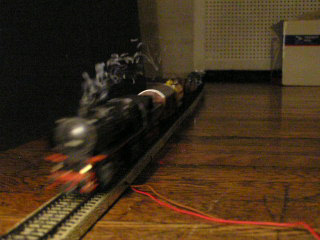 Movie -- Smoking Borsig
This is a Mallet engine, from a basic design named for Swiss engineer Anatole Mallet. This idea was first worked up in 1890, and you can read more about it on The Classic Trains Magazine website. Märklin has made newer versions recently, some with special tenders with working fans, some in a light grey paint scheme, and with digital control and sound effects. But I like my version, even if its a bit banged up. I got it off ebay back in 1999, and then got the smoke stacks on a trip to Amsterdam in 2000. It was my first experience with steam on my layout, and I loved it.
As a result, this spring I asked my friend Zicarlo Van Aalderen to get me a nice bottle of smoke oil, since I had used the last of the oil that came with the original units, and the price of replacement oil from the dealers was a bit steep. I experimented for a while with different substitutes like 3-in-1 and parafin oil, but they just weren't the same.
I'm putting this up for Zicarlo, since he didn't get a chance to see it running when he was here in May of 2006. This was originally just the test movie for the one I really wanted to make, but I had to give back the borrowed digital camera that I used.
Real Live Steam Engines
100 years ago toy trains were not electric, they were actually clockwork or real steam. Marklin made beautiful working steam engines back then, and they still do now, in 1 Gauge. This gauge is huge, and is usually used for Garden Layouts. Here is a model of the Royal Bavarian State Railroad class S 3/6 in the green provincial railroad paint scheme. It runs on live steam produced by heating water in a boiler fired by real flames.
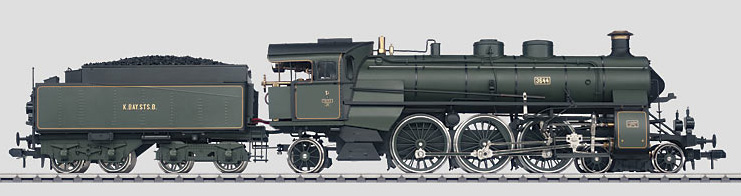 Märklin Model 55005 Live Steam Engine, Length 26-3/8 Inches over buffers.
Note that this model is over 2 feet long, and made out of solid metal. It has to be, it has to handle the pressures of boiling water and steam, and that is Big Time Boom if you get it wrong. It also has no play value for the Cat. Unlike HO engines, which are around Mouse size and no match for your average pouncing pussy, this engine outweighs the Cat, is as fast as the Cat, and makes lots of scary hissing and spitting noises when fired up. I haven't tested this, but I guarantee your average Cat is going to have instant respect for this thing.
In fact, here's the warning from the Märklin Product Listing for this lovely item:
Important Notes: This locomotive may only be operated outdoors and only by adults. The locomotive boiler may never be fired up without a sufficient supply of water in it. Dirty track caused by residues of steam and oil cannot be avoided. Depending on the load, a full boiler of water allows you to run the locomotive from about 20 to 30 minutes. Cars with regular Märklin claw couplers can be coupled to the locomotive. This model can be used in most countries in Europe.
And, did I mention its Remote Controlled? There is a receiver built into the tender, and you can run it from a hand-held transmitter. So, when your beer is empty, you start her up and run her next to the table in your backyard, and put your empty on one of the freight cars. Then you run her into the kitchen on the special siding you made and blow the whistle so the hausfrau can put another Beck's on the freight car. Or a note telling you she's leaving you because you spend too much time with the trains.
Too bad I don't have a Garden up here in my Trendy NY Apartment.